What would you do if the practice you love was causing you harm? Yoga teacher Patricia Sullivan shares her journey of injury, self-discovery, healing, and remaking of her Headstand.
I first noticed numbness in my right hand six years ago while sculpting a highly detailed model of Shiva/Shakti, destined for casting in bronze. Over the next few months, holding on to my sculpting tools became excruciatingly difficult, if not impossible. Despite my efforts to address the problem with bodywork and yoga, the numbness got worse. About a year into this chronic pain, I woke up hourly with viselike gripping sensations in both of my hands. For three weeks, I spent the early-morning hours pacing and shaking my hands until the pain subsided. This prolonged lack of sleep led to my lowest point yet: I fell asleep at the wheel while driving along a winding road around a lagoon. My car became airborne, flew over the embankment, and landed in the low-tide mud flats 50 yards or so from the road.
Fortunately I wasn't injured from the car accident, but it served as a wake-up call—one that motivated me to see a doctor for my chronic pain. The doctor ordered cervical x-rays. They showed extensive damage, including a reversed cervical curve, disk degeneration, and bony deposits that were partially blocking nerve outlets. The degeneration had occurred gradually over a number of years. My doctor and I both suspected the cause: I had been practicing long holds of Salamba Sirsasana (Supported Headstand) for years, even though it was painful. My longing to excel both in my asana practice and as an asana teacher, had led me to ignore my body's signals and cries for relief. Faced with my now-brutal reality, I began a deeply humbling journey of examining how my practice had caused me so much harm.
See also Yoga for Fibromyalgia & Chronic Pain
The Benefits of Headstand
For years, I had experienced Headstand's benefits firsthand. According to the yoga tradition, the pose, known as the king of the asanas, affects every system of the body, including the cardiovascular, lymph, endocrine, and digestive systems—in addition to enhancing prana, or life force. Numerous texts, old and new, encourage the practice of Headstand and speak of its profound benefits, such as a renewed sense of vitality, mental clarity, steadiness, and calm. Many people believe that the complete reversal of our usual upright position enhances circulation, which is known for its cleansing, nourishing, and healing effects.
My regular practice of inversions such as Headstand had strengthened my upper body and given me balance. Headstand had also given me confidence in my ability to remain balanced in a whole range of situations, provided a daily feeling of profound renewal, and lifted my spirits. I didn't want to give up all of that, but clearly I needed to make a change.
See also Use Awareness to Balance in Headstand
The Risks of Headstand
When I look back on my yoga journey, I can see it wasn't just the pose that contributed to my injury—it was the way I practiced the pose. I came to yoga at the age of 21 in very good physical condition. Getting into Headstand and Salamba Sarvangasana (Supported Shoulderstand) was easy, and I soon began extending the time I stayed in these poses. But I had no awareness of healthy biomechanics nor a long-term plan for gradually becoming more proficient. At that age, I was susceptible to the suggestion from some of my teachers that I needed to persevere through pain in order to be rewarded with the stamina required to reap the pose's benefits. So I pressed on, eager to prove myself.
There had been a fleeting early-warning sign years before my hands went numb. For a period of time, I developed a frozen neck—in order to look from side to side, I had to turn my whole body, as my neck muscles were painfully protecting me from doing further damage. But after some expensive chiropractic treatments, my symptoms diminished, and I returned to inversions—and to my quest to achieve the recommended minimum time of 10 minutes in Headstand. Once I had achieved that goal, I wanted to move on and learn the exciting and exotic-looking variations. As the years went by, I simply got accustomed to a certain level of pain. At that time, it was an acceptable tradeoff for the positive effects I enjoyed.
See also Ask the Expert: How Do I Know I'm Ready to Try Headstand?
Journey to Wholeness is Slow, Yet Steady
After the car accident, I surrendered to the possibility that I'd never do Headstand again and allowed myself to concentrate on recovering. I did physical therapy, meditation, Rolfing, and qigong. I adopted an Ayurvedic diet and lifestyle. I also faced the disappointment of abstaining from not only Headstand but also Adho Mukha Svanasana (Downward-Facing Dog Pose), Urdhva Mukha Svanasana (Upward-Facing Dog Pose), Chaturanga Dandasana (Four-Limbed Staff Pose), Shoulderstand, and other poses that I once practiced with ease. Then, after about three years, as I regained a sense of ease in my neck and arms, I found myself entertaining the idea of building back up to Headstand. This time around, I was determined to make my attempt at the pose an opportunity for self-exploration rather than an exercise ruled by ego and ambition. So, I played with props and created variations of poses. I also took my time with my practice.
The first hurdle was practicing Downward-Facing Dog without numbness. When I could do that, I began working in very small increments with poses such as the forearm plank variations and the vertical hold you see here, to strengthen and support my shoulder girdle in order to prevent compression. I found ways to create space in my body as I attempted to invert—for example, I began practicing a supported Shoulderstand using a bolster and a chair to keep my neck off the ground and most of the weight in my sacrum.
Finally, I attempted my first Headstand using a stack of blocks to avoid putting weight on my head. I remained weak and shaky for months. Instead of fighting it, I honored that and came down after only 20 to 30 seconds. I built up slowly, second by second. When at last I built up to a freestanding Headstand, I held the pose for only half a minute.
Today, I still actively practice my variations and preparatory poses so I can safely do Headstand. I practice freestanding Headstand two to three times a week for two to three minutes, and the block-supported Headstand about three times a week. I can do this safely, without any negative effects. The bony changes in my neck linger, no doubt; the nerve inflammation returns if I'm not careful. And though I'm back to Headstand, my current inversion mainstays are Viparita Karani (Legs-up-the-Wall Pose) and chair-supported Shoulderstand. I can remain in Viparita for much longer periods of time, concentrating on breathwork and settling into a calming, mindful awareness.

Learn to Train, Not Strain
If you want to practice Headstand safely, do an honest assessment of your physical, mental, and emotional state each time you practice. The strength and concentration required for Headstand may not be there on any given day. Also, if you haven't been able to release the stress in your practice prior to coming to Headstand, you may be too distracted to apply yourself fully to the challenge.
To do Headstand, it's also important to consistently train and strengthen the shoulders and upper back. Here's why: In standing poses, we support the weight of our bodies via the pelvis and the long, strong bones of the legs. In Headstand, however, our body weight is supported by the smaller, frailer bones of the neck. If you align the upper back and shoulders properly, you can offset some of the pressure on the neck. But the shoulder joints are relatively less stable than all of the other joints in your body, and it can take years to build up the strength and body awareness to create the necessary support for a properly aligned Headstand.
Be Compassionate With Yourself and Inquire From Within
I believe that with proper guidelines and preparation, most people can avoid injuries due to Headstand. I recommend working with an experienced teacher who can look at your body's proportions; each body is different, so each person's approach must be customized. A good teacher will guide you to avoid placing undue pressure on the delicate cervical vertebrae or disks and encourage you not to build up your time too quickly.
But perhaps the most important thing to remember when you consider a pose like Headstand—or any other advanced pose—is that yoga is about discovering your Self and living from it every day. If competitiveness and athletic accomplishment overshadow this purpose, you lose a valuable opportunity to live from a place of wholeness and to serve as a living example for others in this world. Although I believed that I had cultivated this approach in my yoga practice, I came to see how my ego had created blind spots in my vision.
These days, the pose feels different to me because I'm not trying to prove myself or get approval by practicing it. Instead, I'm using it as a tool for awakening as well as simply enjoying the wonderful feeling of being completely upside down and the increased vigor I feel afterward. This is the gem I received as a result of meeting my pain and injury with compassion and self-inquiry. At 61 years old, I hope I've learned to truly listen to this instrument I call my body and my mind, and to honor my inner wisdom. I encourage you to take the same approach in your practice. The benefits far outweigh the risks.
Lay the Foundation to a Healthy Headstand
The poses that follow will help you build the strength and awareness needed to do Headstand safely. Take as much time as you need—weeks, months, or even years—to work on the preparatory poses.Once you do float up to Headstand, the ease that you will experience in the pose will be worth your efforts. If you are a beginner, or if you feel that you should avoid Headstand altogether for whatever reason, practice the preparatory poses to build strength in, and awareness of, your upper back and shoulders, which will help you in daily life. For your inversion practice, you can opt for Viparita Karani and bask in the ease and benefits of inverting by putting your legs up the wall.
When to Avoid Practicing Headstand
You should not practice Headstand if you have retinal problems, high blood pressure, cervical strain, stenosis, or compressed cervical disks. People with marked spinal asymmetries such as scoliosis should work with an experienced instructor. Do not practice inversions during menstruation. Practice during pregnancy only with guidance. And finally, any neck pain is an indication that your Headstand setup or variation isn't working for you and that you should consult an experienced teacher.
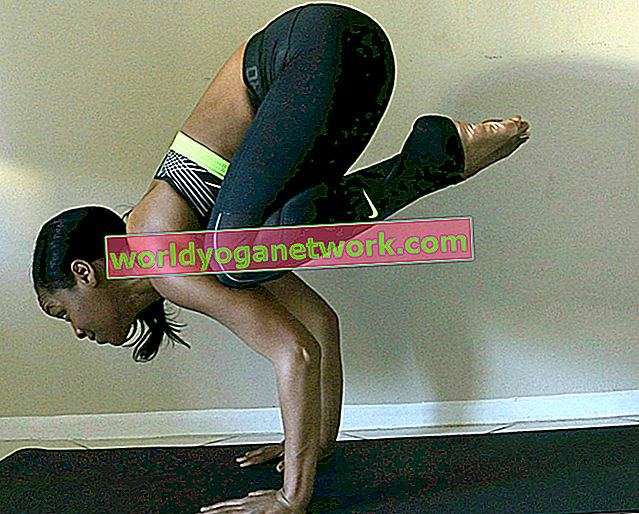
Fully Support the Neck During Headstand
Sullivan demonstrates the importance of taking your body proportions into account before doing Headstand: With her hands in Headstand position, her head is clearly above the horizontal line of her forearms, which means that her neck will not be fully supported by her arms in Headstand. Try this in front of a mirror at home and, if you have similar proportions, consult an experienced teacher for propping options.
Forearm Dog with Blocks
Benefits: Opens the shoulders; allows you to experience the sensation of letting your neck and crown lengthen downward while bearing very little body weight.
Set up two blocks. Place one block flat with its short edge touching a wall. Place the other block on top of it, with one end on the floor and the other end resting on the edge of the first block at a diagonal.
Begin on your forearms and knees, with your elbows shoulder-width apart on the floor. Place your hands on either side of the lower block and press in lightly. Press your forearms, hands, and wrists down. On an exhalation, lift your knees off the ground and your hips toward the ceiling. Rest the crown of your head on the slanted block. Your spine should form a straight line from your head to your tailbone. Now that you are set up, use your shoulders, back, and belly to move your weight toward your hips while lengthening your neck and head toward the block. (Depending on your body proportions, the slanted block may need to be adjusted so that your head reaches the block.) Start with your heels reaching toward the floor, then raise them an inch or 2 and engage shoulders, back, and belly away from the floor. This will prevent weight from being transferred to the neck and will further strengthen the core and shoulder girdle. Stay here for 5 breaths.

Forearm Plank Pose with Gliding and Pumping
Benefits: Strengthens your core, spine, neck, and the deep muscles in the upper back and ribs that support you in Headstand.
From a kneeling position, place your forearms on the mat, with your elbows shoulder-width apart and directly below your shoulder joints, fingers interlaced. Widen your shoulder blades and firmly snug them on the rib cage to make the upper back wide. Resist collapsing through the waist by using the strength of your lower and middle belly. Walk your feet back until you are in Plank Pose on the forearms. Start the glides: Slide your body forward and back a few inches by rolling on the toes, keeping the back of the neck long and in line with the spine.
Do this several times, then rest in Balasana (Child's Pose) for a few deep breaths.
Come into Forearm Plank again to begin the pumps. On an inhalation, allow the shoulder blades to migrate toward each other while lowering the chest a few inches toward the floor without sagging at the waist; then, with the exhalation, slowly pump back up again to the starting position. The slow movements recruit more muscle fibers, strengthening muscles more thoroughly than quicker movements will. After doing the pumps slowly 2 more times, rest again in Child's Pose. Repeat the glides and pumps 2 times each, resting between each one. Over time, build to 5 to 10 times each.

Vertical Hold
Benefits: Strengthens the shoulder girdle and enables you to practice keeping the neck long and decompressed.
Place your forearms on the mat, with your elbows shoulder-distance apart and your hands clasped. Lift your knees off the ground and tiptoe forward so the spine becomes nearly vertical and the back of your head rests lightly on your wrists. Hold for several breaths without straining the neck. Over time, build up to a 30-second hold. This position will help stabilize the torso while you're upside down; the latissimus dorsi and serratus anterior prevent you from toppling backward, while the core abdominals stabilize from the front.
Headstand Preparation Using a Block Stack for Thoracic Support
Benefits: Supports and opens the upper back and shoulders while stretching and strengthening the shoulder girdle.
Set up your blocks. Place a block so it stands up vertically 2 or more inches from the wall on a sticky mat. (Where this block ultimately ends up depends on how flat or rounded your upper back is and how long your upper arms are in relation to your neck.) Place a second block on top of, and perpendicular to, the first block. The third block comes out from the wall lengthwise on the flat dimension, resting on the middle block, one end at the wall. The block setup may seem onerous, but it helps to fully support the body and protect the neck.
Begin on your knees facing the blocks with the elbows shoulder-width apart. Wrap your fingertips firmly around the vertical block. Press into the floor with your forearms and wrists. On an exhalation, lift your knees off the floor, raise the hips, and lift your heels. Your head should be off the floor. Tiptoe forward until your upper back presses onto the blocks and the back of your head touches the vertical block. The top of your head will only lightly touch the floor, if at all.
Estire las piernas si es posible, aunque es posible que las rodillas deban permanecer algo flexionadas para caminar lo suficiente hacia adelante como para llevar la parte superior de la espalda a los bloques. Sienta cómo los bloques evitan que la parte superior de la espalda y los hombros se colapsen hacia la pared mientras camina con los pies más cerca de los bloques. (Cuando la parte superior de la espalda se colapsa, su cuello recibe demasiado peso, lo que lo pone en riesgo de tensión). Mantenga la espalda presionada firmemente contra los bloques con las caderas estiradas durante 30 segundos a un minuto. Si desea continuar, practique levantar una pierna. Mantenga la pierna levantada durante varios segundos. Baje esta pierna y repita con la otra pierna, aumentando gradualmente a unos 30 segundos con el tiempo, siempre que su cuello permanezca cómodo.
Variación del soporte para la cabeza con pila de bloques
Beneficios: Permite a las personas con compresión de disco cervical disfrutar de la inversión sin correr el riesgo de sufrir más daños.
Usando la misma configuración de bloques, levante una pierna y salte de la otra pierna para entrar en Sirsasana completo, con la espalda apoyada en los bloques y la cabeza completamente fuera del piso o tocando ligeramente. (Es posible que necesite la ayuda de un maestro con experiencia). Dado que los bloqueos le impiden equilibrarse hacia atrás con los hombros y las caderas, levantarse puede ser un poco como saltar para ponerse de manos. Si su equilibrio no se siente estable, doble las rodillas y presione los pies contra la pared. Esto le permitirá alinearse desde las rodillas hasta los hombros mientras disfruta del apoyo de los bloques y la pared. Quédate unos segundos; luego aumente gradualmente sus agarres de acuerdo con lo que le parezca apropiado.

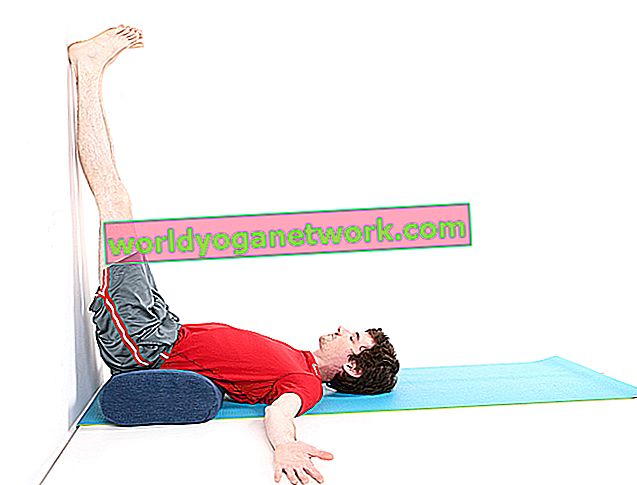
Viparita Karani (Postura de piernas hacia arriba)
Beneficios: Fomenta la relajación profunda mientras invierte el cuerpo.
Coloque una almohada o mantas de 4 a 5 pulgadas de distancia de la pared. Siéntese en el extremo del cojín, con el lado derecho al lado de la pared y los pies en el piso frente a usted. Coloque su mano izquierda en el piso, luego baje la parte superior del cuerpo hacia el piso. Al mismo tiempo, levante y gire las nalgas hacia la pared, manteniéndolas en contacto con ella. Lleva tu hombro izquierdo hacia el piso cerca del cojín y rueda sobre tu espalda. Deslícese lo más cerca posible de la pared manteniendo las piernas rectas. Asegúrese de que el cojín apoye su curva lumbar y que su coxis se sienta como si estuviera cayendo hacia el piso. (Algunas personas se sienten más cómodas si el sacro también está bien apoyado, mientras que otras necesitan estar más lejos de la pared debido a los isquiotibiales tensos).una mano en la palma relajada de la otra. Dirija su atención hacia adentro, hacia la respiración y una conciencia más sutil. Los estudiantes principiantes pueden quedarse por varios minutos, mientras que los estudiantes experimentados pueden quedarse aún más tiempo.
Sobre nuestro autor